<?xml version="1.0" encoding="utf-8"?><feed xmlns="http://www.w3.org/2005/Atom" ><generator uri="https://jekyllrb.com/" version="4.4.1">Jekyll</generator><link href="https://www.bariskisir.com/feed.xml" rel="self" type="application/atom+xml" /><link href="https://www.bariskisir.com/" rel="alternate" type="text/html" /><updated>2026-09-05T19:42:40+03:00</updated><id>https://www.bariskisir.com/feed.xml</id><title type="html">Barış Kısır</title><subtitle>Barış Kısır - Lead Software Developer | Personal Website &amp; Blog</subtitle><author><name>Barış Kısır</name></author><entry><title type="html">Use Claude Code with Different Providers</title><link href="https://www.bariskisir.com/blog/use-claude-code-with-different-providers" rel="alternate" type="text/html" title="Use Claude Code with Different Providers" /><published>2026-03-17T00:00:01+03:00</published><updated>2026-03-17T00:00:01+03:00</updated><id>https://www.bariskisir.com/blog/use-claude-code-with-different-providers</id><content type="html" xml:base="https://www.bariskisir.com/blog/use-claude-code-with-different-providers"><![CDATA[<p><img src="/assets/img/posts/use-claude-code-with-different-providers/claude-code.png" alt="Claude Code" width="65%" /></p>

<p>Claude Code is a powerful command-line tool that brings AI-powered code generation and analysis to your terminal. While it defaults to Anthropic’s API, you can extend its capabilities by configuring it to work with different AI providers. This guide shows you how to set up Claude Code with various providers to access free and paid model options.</p>

<hr />

<h2 id="installing-claude-code">Installing Claude Code</h2>

<p>First, install Claude Code for your operating system.</p>

<hr />

<h4 id="windows">Windows</h4>

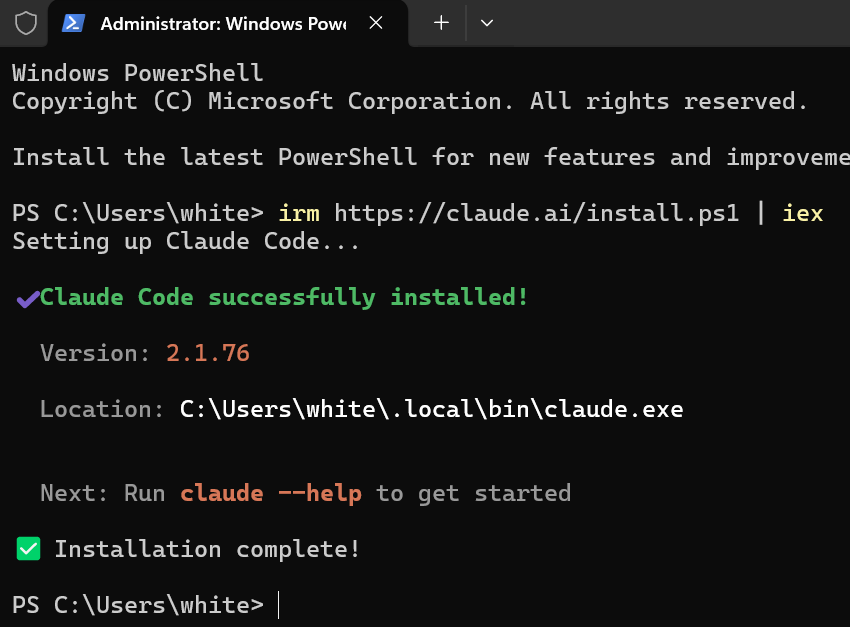
<p>Run with PowerShell:</p>

<div class="language-powershell highlighter-rouge"><div class="highlight"><pre class="highlight"><code><span class="n">irm</span><span class="w"> </span><span class="nx">https://claude.ai/install.ps1</span><span class="w"> </span><span class="o">|</span><span class="w"> </span><span class="n">iex</span><span class="w">
</span></code></pre></div></div>

<p><img src="/assets/img/posts/use-claude-code-with-different-providers/windows-install.png" alt="Claude Code Installation" width="60%" /></p>

<hr />

<h4 id="linux--macos">Linux &amp; macOS</h4>

<div class="language-bash highlighter-rouge"><div class="highlight"><pre class="highlight"><code>curl <span class="nt">-fsSL</span> https://claude.ai/install.sh | bash
</code></pre></div></div>

<hr />

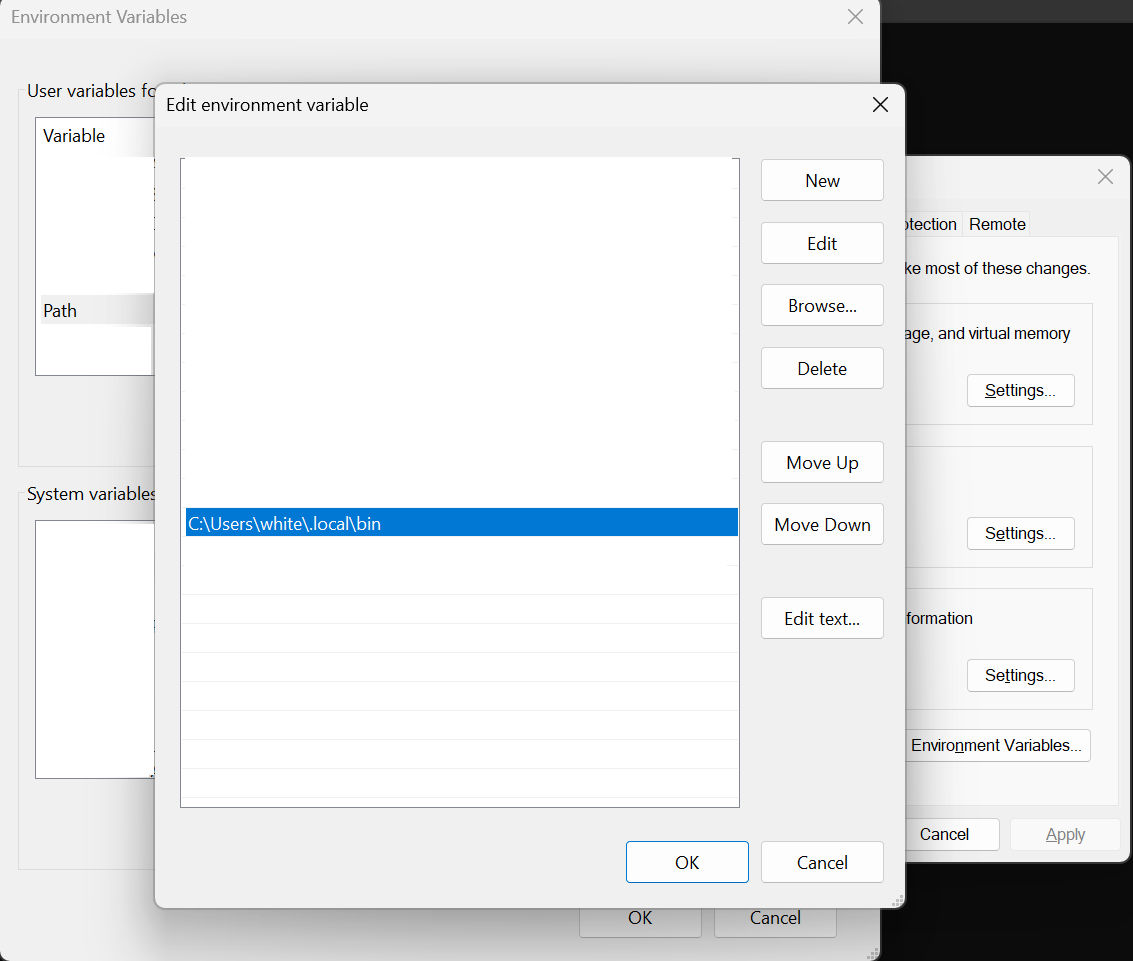
<h3 id="setting-up-the-environment-path-for-claudeexe-windows">Setting up the Environment Path for claude.exe (Windows)</h3>

<p>After installation, add the Claude Code binary folder to your system PATH environment variable.</p>

<div class="language-powershell highlighter-rouge"><div class="highlight"><pre class="highlight"><code><span class="n">C:\Users\USERNAME\.local\bin</span><span class="w">
</span></code></pre></div></div>

<p><img src="/assets/img/posts/use-claude-code-with-different-providers/windows-claudecode-env-bin.png" alt="Claude Code Binary Path Setup" width="60%" /></p>

<hr />

<h3 id="configuration-with-environment-variables">Configuration with Environment Variables</h3>

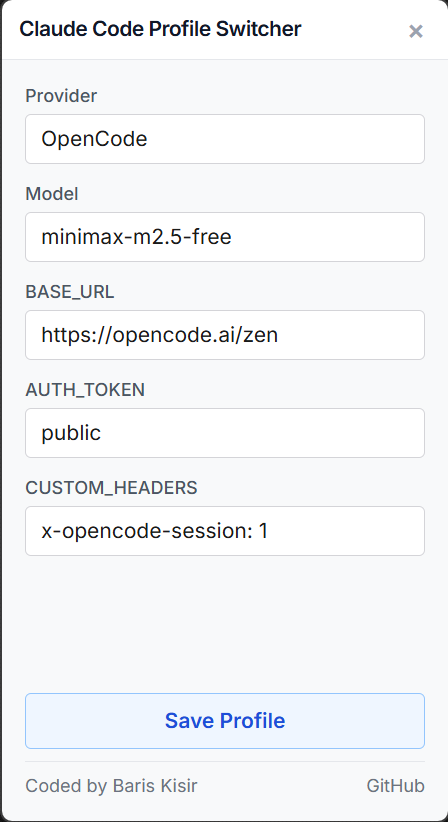
<p>Claude Code can be configured using environment variables to work with different providers. Here are the key environment variables:</p>

<ul>
  <li><strong>ANTHROPIC_BASE_URL</strong> - The API endpoint (default: <code class="language-plaintext highlighter-rouge">https://api.anthropic.com</code>)</li>
  <li><strong>ANTHROPIC_MODEL</strong> - The selected model to use</li>
  <li><strong>ANTHROPIC_AUTH_TOKEN</strong> - Your API key or authentication token</li>
  <li><strong>ANTHROPIC_CUSTOM_HEADERS</strong> - Custom headers for specific providers (optional)</li>
</ul>

<div class="language-bash highlighter-rouge"><div class="highlight"><pre class="highlight"><code><span class="c"># Make sure you have installed Node.js</span>
npx claude-code-profile-switcher
</code></pre></div></div>

<p><img src="https://raw.githubusercontent.com/bariskisir/ClaudeCodeProfileSwitcher/master/screenshot.png" width="30%" alt="Screenshot" /></p>

<p>Select a provider and model, enter your API key, then click save. The tool will store these as environment variables based on your operating system.
Make sure you open a new terminal after setting environment variables.</p>

<hr />

<h5 id="default-model">Default Model</h5>

<p>Run Claude Code with the default configured model:</p>

<div class="language-bash highlighter-rouge"><div class="highlight"><pre class="highlight"><code>claude
</code></pre></div></div>

<hr />

<h5 id="specific-model">Specific Model</h5>

<p>Run Claude Code with a specific model using the <code class="language-plaintext highlighter-rouge">--model</code> flag:</p>

<div class="language-bash highlighter-rouge"><div class="highlight"><pre class="highlight"><code>claude <span class="nt">--model</span> z-ai/glm-5
</code></pre></div></div>

<hr />

<h5 id="skip-permission-checks">Skip Permission Checks</h5>

<p>If needed, you can skip permission confirmations with the <code class="language-plaintext highlighter-rouge">--allow-dangerously-skip-permissions</code> flag:</p>

<div class="language-bash highlighter-rouge"><div class="highlight"><pre class="highlight"><code>claude <span class="nt">--model</span> moonshotai/kimi-k2.5 <span class="nt">--allow-dangerously-skip-permissions</span>
</code></pre></div></div>

<hr />

<h3 id="finding-free-and-trial-providers">Finding Free and Trial Providers</h3>

<p>Many providers offer free and trial LLMs that work with Claude Code. Check out this comprehensive list:</p>

<p><a href="https://gist.github.com/bariskisir/397327752c86c6e5a815ce524621ae79">Free and Trial Providers List</a></p>

<hr />

<h3 id="bonus-add-claude-code-to-windows-context-menu">Bonus: Add Claude Code to Windows Context Menu</h3>

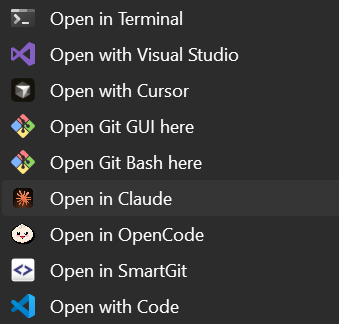
<p>Make Claude Code even more convenient by adding it to your Windows right-click context menu.</p>

<hr />

<h5 id="install-context-menu">Install Context Menu</h5>

<div class="language-bash highlighter-rouge"><div class="highlight"><pre class="highlight"><code>powershell <span class="nt">-ExecutionPolicy</span> Bypass <span class="nt">-Command</span> <span class="s2">"irm https://raw.githubusercontent.com/bariskisir/ClaudeCodeContextMenu/master/install.ps1 | iex"</span>
</code></pre></div></div>
<hr />

<h5 id="uninstall-context-menu">Uninstall Context Menu</h5>

<div class="language-bash highlighter-rouge"><div class="highlight"><pre class="highlight"><code>powershell <span class="nt">-ExecutionPolicy</span> Bypass <span class="nt">-Command</span> <span class="s2">"irm https://raw.githubusercontent.com/bariskisir/ClaudeCodeContextMenu/master/uninstall.ps1 | iex"</span>
</code></pre></div></div>

<h2><img src="https://raw.githubusercontent.com/bariskisir/ClaudeCodeContextMenu/master/screenshot.png" alt="Claude Code Context Menu" width="30%" /></h2>

<hr />

<h3 id="references--documentation">References &amp; Documentation</h3>

<p>Claude Code Quick Start - <a href="https://code.claude.com/docs/en/quickstart">https://code.claude.com/docs/en/quickstart</a></p>

<p>LLM Gateway - <a href="https://code.claude.com/docs/en/llm-gateway">https://code.claude.com/docs/en/llm-gateway</a></p>

<p>Model Configuration - <a href="https://code.claude.com/docs/en/model-config">https://code.claude.com/docs/en/model-config</a></p>

<p>Environment Variables - <a href="https://code.claude.com/docs/en/env-vars">https://code.claude.com/docs/en/env-vars</a></p>

<p>Claude Code Context Menu - <a href="https://github.com/bariskisir/ClaudeCodeContextMenu">https://github.com/bariskisir/ClaudeCodeContextMenu</a></p>

<p>OpenCode Context Menu - <a href="https://github.com/bariskisir/OpenCodeContextMenu">https://github.com/bariskisir/OpenCodeContextMenu</a></p>

<p>Codex Context Menu - <a href="https://github.com/bariskisir/CodexContextMenu">https://github.com/bariskisir/CodexContextMenu</a></p>

<p>Gemini Context Menu - <a href="https://github.com/bariskisir/GeminiContextMenu">https://github.com/bariskisir/GeminiContextMenu</a></p>]]></content><author><name>Barış Kısır</name></author><category term="ai" /><category term="integration" /><summary type="html"><![CDATA[Configure Claude Code with different AI providers. Access free and paid models including Gemini, OpenAI, and Groq.]]></summary><media:thumbnail xmlns:media="http://search.yahoo.com/mrss/" url="https://www.bariskisir.com/assets/img/posts/use-claude-code-with-different-providers/claude-code.png" /><media:content medium="image" url="https://www.bariskisir.com/assets/img/posts/use-claude-code-with-different-providers/claude-code.png" xmlns:media="http://search.yahoo.com/mrss/" /></entry><entry><title type="html">Is Chess960 Actually Fair? Breaking Down the Numbers</title><link href="https://www.bariskisir.com/blog/is-chess960-actually-fair-breaking-down-the-numbers" rel="alternate" type="text/html" title="Is Chess960 Actually Fair? Breaking Down the Numbers" /><published>2026-02-14T09:55:00+03:00</published><updated>2026-02-14T09:55:00+03:00</updated><id>https://www.bariskisir.com/blog/is-chess960-actually-fair-breaking-down-the-numbers</id><content type="html" xml:base="https://www.bariskisir.com/blog/is-chess960-actually-fair-breaking-down-the-numbers"><![CDATA[<p><a href="https://www.freestyle-chess.com/2026-germany-weissenhaus/" target="_blank">
  <img src="/assets/img/posts/freestyle-chess-2026.jpg" alt="Freestyle Chess World Championship" width="70%" />
</a></p>

<p>In Chess960, the starting position is randomly selected from 960 possibilities before the match, with two rules: Bishops must be on opposite colors, and the King must be between the Rooks.</p>

<p>Have you ever wondered if the “First Move Advantage” in chess is actually fair? Or does randomization in Chess960 (Fischer Random) introduce a hidden “Luck Factor” that we haven’t fully quantified?</p>

<p>In standard chess, we know White starts with a slight edge. But what happens when you shuffle the pieces into one of 960 random positions? Is every starting position created equal? I decided to find out using <strong>Stockfish 18</strong> at a consistent <strong>Depth 25</strong>.</p>

<h2 id="the-luck-gap">The “Luck” Gap</h2>

<p>I analyzed all 960 starting positions. The results were fascinating—and a bit concerning for competitive integrity.</p>

<p>While standard chess (Position 518) gives White a familiar <strong>+0.32</strong> advantage, some shuffle variations push this number to nearly <strong>+0.80</strong>. To put that in perspective, +0.80 is almost a full pawn advantage without a single move being played.</p>

<p>On the flip side, some setups are incredibly docile, evaluating at a dead <strong>0.00</strong>.</p>

<blockquote>
  <p><strong>The Unofficial “Luck Factor”:</strong> If the randomizer selects ID <strong>#80</strong> (Highest Advantage), White is effectively gifted a winning advantage. If ID <strong>#644</strong> is selected, the game starts dead even. In a short tournament format, this variance matters.</p>
</blockquote>

<h2 id="the-data">The Data</h2>

<p>Here are the positions where the “Luck of the Draw” heavily favors White, and the positions where Black has the easiest time equalizing.</p>

<h3 id="️-whites-top-10-highest-advantage">🏛️ White’s Top 10 (Highest Advantage)</h3>
<p>Randomization gifts White a massive head start here. Eval is near <strong>+0.80</strong>.</p>

<table>
  <thead>
    <tr>
      <th style="text-align: left">ID</th>
      <th style="text-align: left">Eval</th>
      <th style="text-align: left">Placement</th>
      <th style="text-align: left">Pieces</th>
    </tr>
  </thead>
  <tbody>
    <tr>
      <td style="text-align: left"><strong>80</strong></td>
      <td style="text-align: left"><strong>+0.80</strong></td>
      <td style="text-align: left"><code class="language-plaintext highlighter-rouge">BBNNRKRQ</code></td>
      <td style="text-align: left">♗♗♘♘♖♔♖♕</td>
    </tr>
    <tr>
      <td style="text-align: left">477</td>
      <td style="text-align: left">+0.79</td>
      <td style="text-align: left"><code class="language-plaintext highlighter-rouge">RNNBKRBQ</code></td>
      <td style="text-align: left">♖♘♘♗♔♖♗♕</td>
    </tr>
    <tr>
      <td style="text-align: left">604</td>
      <td style="text-align: left">+0.77</td>
      <td style="text-align: left"><code class="language-plaintext highlighter-rouge">RBQNKRBN</code></td>
      <td style="text-align: left">♖♗♕♘♔♖♗♘</td>
    </tr>
    <tr>
      <td style="text-align: left">848</td>
      <td style="text-align: left">+0.77</td>
      <td style="text-align: left"><code class="language-plaintext highlighter-rouge">BBRKNRNQ</code></td>
      <td style="text-align: left">♗♗♖♔♘♖♘♕</td>
    </tr>
    <tr>
      <td style="text-align: left">879</td>
      <td style="text-align: left">+0.77</td>
      <td style="text-align: left"><code class="language-plaintext highlighter-rouge">QRKRNNBB</code></td>
      <td style="text-align: left">♕♖♔♖♘♘♗♗</td>
    </tr>
    <tr>
      <td style="text-align: left">935</td>
      <td style="text-align: left">+0.77</td>
      <td style="text-align: left"><code class="language-plaintext highlighter-rouge">RKBRNQNB</code></td>
      <td style="text-align: left">♖♔♗♖♘♕♘♗</td>
    </tr>
    <tr>
      <td style="text-align: left">794</td>
      <td style="text-align: left">+0.75</td>
      <td style="text-align: left"><code class="language-plaintext highlighter-rouge">RQKNBBRN</code></td>
      <td style="text-align: left">♖♕♔♘♗♗♖♘</td>
    </tr>
    <tr>
      <td style="text-align: left">176</td>
      <td style="text-align: left">+0.74</td>
      <td style="text-align: left"><code class="language-plaintext highlighter-rouge">BBNRNKRQ</code></td>
      <td style="text-align: left">♗♗♘♖♘♔♖♕</td>
    </tr>
    <tr>
      <td style="text-align: left">557</td>
      <td style="text-align: left">+0.74</td>
      <td style="text-align: left"><code class="language-plaintext highlighter-rouge">RNKBNQBR</code></td>
      <td style="text-align: left">♖♘♔♗♘♕♗♖</td>
    </tr>
  </tbody>
</table>

<hr />

<h3 id="️-blacks-top-10-least-disadvantage">🛡️ Black’s Top 10 (Least Disadvantage)</h3>
<p>These positions are effectively drawn from move 1. Eval is <strong>-0.01</strong> to <strong>+0.12</strong>.</p>

<table>
  <thead>
    <tr>
      <th style="text-align: left">ID</th>
      <th style="text-align: left">Eval</th>
      <th style="text-align: left">Placement</th>
      <th style="text-align: left">Pieces</th>
    </tr>
  </thead>
  <tbody>
    <tr>
      <td style="text-align: left"><strong>644</strong></td>
      <td style="text-align: left"><strong>-0.01</strong></td>
      <td style="text-align: left"><code class="language-plaintext highlighter-rouge">RBBNKRQN</code></td>
      <td style="text-align: left">♖♗♗♘♔♖♕♘</td>
    </tr>
    <tr>
      <td style="text-align: left">247</td>
      <td style="text-align: left">+0.07</td>
      <td style="text-align: left"><code class="language-plaintext highlighter-rouge">NRBKQNRB</code></td>
      <td style="text-align: left">♘♖♗♔♕♘♖♗</td>
    </tr>
    <tr>
      <td style="text-align: left">497</td>
      <td style="text-align: left">+0.08</td>
      <td style="text-align: left"><code class="language-plaintext highlighter-rouge">BRQBNKNR</code></td>
      <td style="text-align: left">♗♖♕♗♘♔♘♖</td>
    </tr>
    <tr>
      <td style="text-align: left">774</td>
      <td style="text-align: left">+0.09</td>
      <td style="text-align: left"><code class="language-plaintext highlighter-rouge">QRBKNBRN</code></td>
      <td style="text-align: left">♕♖♗♔♘♗♖♘</td>
    </tr>
    <tr>
      <td style="text-align: left">204</td>
      <td style="text-align: left">+0.09</td>
      <td style="text-align: left"><code class="language-plaintext highlighter-rouge">QBNRKNBR</code></td>
      <td style="text-align: left">♕♗♘♖♔♘♗♖</td>
    </tr>
    <tr>
      <td style="text-align: left">194</td>
      <td style="text-align: left">+0.10</td>
      <td style="text-align: left"><code class="language-plaintext highlighter-rouge">BQNRKBNR</code></td>
      <td style="text-align: left">♗♕♘♖♔♗♘♖</td>
    </tr>
    <tr>
      <td style="text-align: left">603</td>
      <td style="text-align: left">+0.11</td>
      <td style="text-align: left"><code class="language-plaintext highlighter-rouge">RQNKBRNB</code></td>
      <td style="text-align: left">♖♕♘♔♗♖♘♗</td>
    </tr>
    <tr>
      <td style="text-align: left">29</td>
      <td style="text-align: left">+0.11</td>
      <td style="text-align: left"><code class="language-plaintext highlighter-rouge">NQNBRKBR</code></td>
      <td style="text-align: left">♘♕♘♗♖♔♗♖</td>
    </tr>
    <tr>
      <td style="text-align: left">593</td>
      <td style="text-align: left">+0.12</td>
      <td style="text-align: left"><code class="language-plaintext highlighter-rouge">BRQBNKRN</code></td>
      <td style="text-align: left">♗♖♕♗♘♔♖♘</td>
    </tr>
    <tr>
      <td style="text-align: left">269</td>
      <td style="text-align: left">+0.12</td>
      <td style="text-align: left"><code class="language-plaintext highlighter-rouge">NRKBNQBR</code></td>
      <td style="text-align: left">♘♖♔♗♘♕♗♖</td>
    </tr>
  </tbody>
</table>

<hr />

<h2 id="conclusion">Conclusion</h2>

<p>Chess960 succeeds in killing memorization, but it introduces a new variable: <strong>Randomness</strong>. While aiming to test pure skill, it inadvertently tests a player’s ability to adapt to “lucky” or “unlucky” starting evaluations.</p>

<p><strong>However, this analysis is strictly for engines.</strong> For humans, the reality is different. Being White in a completely unfamiliar position—without centuries of theory to guide you—can actually feel like a disadvantage. You are forced to formulate a plan from scratch while under pressure, often making the “First Move Advantage” purely theoretical.</p>

<p>Perhaps true fairness isn’t about equal engine evaluations, but about how well you can navigate the unique chaos you’re dealt.</p>

<blockquote>
  <p><em>This analysis was inspired by the <strong><a href="https://www.freestyle-chess.com/2026-germany-weissenhaus/" target="_blank">FIDE Freestyle Chess World Championship</a></strong> (Feb 13-15, 2026).</em></p>
</blockquote>

<hr />
<h2 id="references--downloads">References &amp; Downloads</h2>

<ul>
  <li><strong>Tournament:</strong> <a href="https://www.freestyle-chess.com/2026-germany-weissenhaus/" target="_blank">FIDE Freestyle Chess World Championship - Weissenhaus</a></li>
  <li><strong>Project Code:</strong> <a href="https://github.com/bariskisir/Chess960EvalAnalyzer" target="_blank">GitHub Repository</a></li>
  <li><strong>Full Analysis Data:</strong> <a href="https://raw.githubusercontent.com/bariskisir/Chess960EvalAnalyzer/refs/heads/master/src/Chess960EvalAnalyzer/results.csv" target="_blank">Download results.csv</a></li>
</ul>]]></content><author><name>Barış Kısır</name></author><category term="chess" /><category term="analysis" /><summary type="html"><![CDATA[Is Chess960 actually fair? Analysis of all 960 starting positions using Stockfish 18 reveals hidden first-move advantages.]]></summary><media:thumbnail xmlns:media="http://search.yahoo.com/mrss/" url="https://www.bariskisir.com/assets/img/posts/freestyle-chess-2026.jpg" /><media:content medium="image" url="https://www.bariskisir.com/assets/img/posts/freestyle-chess-2026.jpg" xmlns:media="http://search.yahoo.com/mrss/" /></entry><entry><title type="html">Building Multi-Platform Docker Images (amd64 &amp;amp; arm64) the Right Way</title><link href="https://www.bariskisir.com/blog/building-multi-platform-docker-images-amd64-arm64-the-right-way" rel="alternate" type="text/html" title="Building Multi-Platform Docker Images (amd64 &amp;amp; arm64) the Right Way" /><published>2025-06-05T09:15:00+03:00</published><updated>2025-06-05T09:15:00+03:00</updated><id>https://www.bariskisir.com/blog/building-multi-platform-docker-images-amd64-arm64-the-right-way</id><content type="html" xml:base="https://www.bariskisir.com/blog/building-multi-platform-docker-images-amd64-arm64-the-right-way"><![CDATA[<p><strong>The Rise of Heterogeneous Infrastructure</strong></p>

<p>With the proliferation of Apple Silicon (M-series) in development and cost-effective ARM-based instances (like AWS Graviton) in production, the ability to build and distribute multi-platform container images is no longer a luxury—it’s a necessity for modern CI/CD pipelines.</p>

<p><strong>The Problem with <code class="language-plaintext highlighter-rouge">docker build</code></strong></p>

<p>A standard <code class="language-plaintext highlighter-rouge">docker build</code> creates an image for the architecture of the host machine. If you build an image on an Intel-based CI server, it will fail to launch on an ARM-based production cluster.</p>

<p><strong>Introducing Docker Buildx</strong></p>

<p><code class="language-plaintext highlighter-rouge">Docker Buildx</code> is a specialized CLI plugin that extends the docker command with full support for multi-platform builds using <strong>BuildKit</strong>.</p>

<p><strong>Implementation: The Unified Build Command</strong></p>

<p>Using the <code class="language-plaintext highlighter-rouge">--platform</code> flag, you can orchestrate Docker to build for multiple architectures simultaneously and push them as a single <strong>Manifest List</strong> to your registry.</p>

<div class="language-bash highlighter-rouge"><div class="highlight"><pre class="highlight"><code><span class="c"># Create a new builder instance with multi-arch support</span>
docker buildx create <span class="nt">--use</span> <span class="nt">--name</span> multi-arch-builder

<span class="c"># Build and Push for both Intel (amd64) and ARM (arm64)</span>
docker buildx build <span class="nt">--platform</span> linux/amd64,linux/arm64 <span class="se">\</span>
  <span class="nt">-t</span> username/enterprise-app:v1.2 <span class="nt">--push</span> <span class="nb">.</span>
</code></pre></div></div>

<p><strong>Orchestrating the Dockerfile for Multi-Arch</strong></p>

<p>To ensure your Dockerfile is architecture-agnostic, rely on the official .NET images which provide multi-arch manifests out of the box.</p>

<div class="language-dockerfile highlighter-rouge"><div class="highlight"><pre class="highlight"><code><span class="c"># Docker automatically pulls the correct architecture for the 'sdk' tag</span>
<span class="k">FROM</span><span class="w"> </span><span class="s">mcr.microsoft.com/dotnet/sdk:8.0</span><span class="w"> </span><span class="k">AS</span><span class="w"> </span><span class="s">build</span>
<span class="k">WORKDIR</span><span class="s"> /src</span>
<span class="k">COPY</span><span class="s"> . .</span>
<span class="k">RUN </span>dotnet publish <span class="nt">-c</span> Release <span class="nt">-o</span> /app/out

<span class="c"># Final lightweight runtime image</span>
<span class="k">FROM</span><span class="s"> mcr.microsoft.com/dotnet/runtime:8.0</span>
<span class="k">WORKDIR</span><span class="s"> /app</span>
<span class="k">COPY</span><span class="s"> --from=build /app/out .</span>
<span class="k">ENTRYPOINT</span><span class="s"> ["dotnet", "App.dll"]</span>
</code></pre></div></div>

<p><strong>Strategic Advantages</strong></p>

<ol>
  <li><strong>Cost Efficiency:</strong> ARM instances are typically 20-40% cheaper than equivalent x86 instances.</li>
  <li><strong>Performance:</strong> ARM architectures often provide superior performance for specific workloads, such as cryptographic operations or high-concurrency microservices.</li>
  <li><strong>Developer Experience:</strong> Ensures that developers on different hardware (Mac vs. Windows/Linux) are testing the exact same container manifest that will run in production.</li>
</ol>

<p><strong>The Advantage of Platform Agnostic Infrastructure</strong></p>

<p>We are moving toward a world where the underlying CPU architecture should be an implementation detail, not a deployment blocker. By integrating <code class="language-plaintext highlighter-rouge">Buildx</code> and multi-arch manifests into your CI/CD pipeline, you empower your operations team to choose the most cost-effective or highest-performing hardware without requiring a single change to your application code. It’s about building once and knowing your software is ready for whatever infrastructure comes next.</p>]]></content><author><name>Barış Kısır</name></author><category term="docker" /><category term="devops" /><category term="linux" /><summary type="html"><![CDATA[Build multi-platform Docker images for amd64 and arm64 architectures using Docker Buildx and BuildKit for modern CI/CD pipelines.]]></summary></entry><entry><title type="html">Top 5 JWT Authentication Mistakes in .NET APIs</title><link href="https://www.bariskisir.com/blog/top-5-jwt-authentication-mistakes-in-net-apis" rel="alternate" type="text/html" title="Top 5 JWT Authentication Mistakes in .NET APIs" /><published>2024-11-20T18:00:00+03:00</published><updated>2024-11-20T18:00:00+03:00</updated><id>https://www.bariskisir.com/blog/top-5-jwt-authentication-mistakes-in-net-apis</id><content type="html" xml:base="https://www.bariskisir.com/blog/top-5-jwt-authentication-mistakes-in-net-apis"><![CDATA[<p><strong>The Security Illusion of JWTs</strong></p>

<p>JSON Web Tokens (JWT) are ubiquitous in modern API development. However, their perceived simplicity often masks critical security flaws that expose applications to token forgery, identity theft, and replay attacks.</p>

<p><strong>1. Storing Refresh Tokens in Plaintext</strong></p>

<p>Storing refresh tokens as raw strings in your database is a significant security oversight. If your database is compromised, an attacker can use these plaintext tokens to forge new access tokens at will. This creates a high-impact <strong>session hijacking</strong> scenario—reminiscent of vulnerabilities in legacy session management systems—where an attacker can maintain persistent access to a user’s account without ever knowing their credentials.</p>
<ul>
  <li><strong>Fix:</strong> Always treat refresh tokens like passwords. Store only their cryptographically hashed versions (e.g., using SHA-256) and validate the incoming token’s hash against the stored value during the refresh flow.</li>
</ul>

<p><strong>2. Weak Signing Secrets</strong></p>

<p>Using a short or predictable string for your <code class="language-plaintext highlighter-rouge">IssuerSigningKey</code> is a catastrophic vulnerability. Attackers can use brute-force tools (like <code class="language-plaintext highlighter-rouge">jwt-cracker</code>) to discover the secret and sign their own administrative tokens.</p>
<ul>
  <li><strong>Fix:</strong> Use a cryptographically strong, 256-bit (32 character) minimum secret key, ideally stored in a managed key vault.</li>
</ul>

<p><strong>3. Storing Sensitive Data in Claims</strong></p>

<p>Remember that JWT payloads are <strong>encoded</strong>, not <strong>encrypted</strong>. Anyone with access to the token string can decode it (via <code class="language-plaintext highlighter-rouge">jwt.io</code>) and read the claims.</p>
<ul>
  <li><strong>Fix:</strong> Never store passwords, SSNs, or sensitive PII in the token. Only include non-sensitive metadata like <code class="language-plaintext highlighter-rouge">sub</code> (user ID) and <code class="language-plaintext highlighter-rouge">role</code>.</li>
</ul>

<p><strong>4. Ignoring Token Revocation</strong></p>

<p>Because JWTs are stateless, there is no built-in way to “log out” a user if their token is compromised.</p>
<ul>
  <li><strong>Fix:</strong> Implement a <strong>Token Blacklist</strong> (via Redis) or, preferably, utilize <strong>Refresh Tokens</strong> stored in a secure database. Set the Access Token expiration to a very short duration (e.g., 15 minutes).</li>
</ul>

<p><strong>5. Not Validating Critical Parameters</strong></p>

<p>Many implementations fail to strictly validate the <code class="language-plaintext highlighter-rouge">Issuer</code>, <code class="language-plaintext highlighter-rouge">Audience</code>, and <code class="language-plaintext highlighter-rouge">Lifetime</code>.</p>
<ul>
  <li><strong>Fix:</strong> Ensure your <code class="language-plaintext highlighter-rouge">TokenValidationParameters</code> are configured correctly:</li>
</ul>

<div class="language-csharp highlighter-rouge"><div class="highlight"><pre class="highlight"><code><span class="n">options</span><span class="p">.</span><span class="n">TokenValidationParameters</span> <span class="p">=</span> <span class="k">new</span> <span class="n">TokenValidationParameters</span>
<span class="p">{</span>
    <span class="n">ValidateIssuer</span> <span class="p">=</span> <span class="k">true</span><span class="p">,</span>
    <span class="n">ValidateAudience</span> <span class="p">=</span> <span class="k">true</span><span class="p">,</span>
    <span class="n">ValidateLifetime</span> <span class="p">=</span> <span class="k">true</span><span class="p">,</span>
    <span class="n">RequireExpirationTime</span> <span class="p">=</span> <span class="k">true</span><span class="p">,</span>
    <span class="n">ClockSkew</span> <span class="p">=</span> <span class="n">TimeSpan</span><span class="p">.</span><span class="n">Zero</span> <span class="c1">// Remove the default 5-minute leeway</span>
<span class="p">};</span>
</code></pre></div></div>

<p><strong>Security as a Continuous Discipline</strong></p>

<p>The simplicity of JWTs is exactly what makes them dangerous. It’s easy to ship an implementation that “works,” but much harder to ship one that is resilient against a determined attacker. Avoiding these top five mistakes—especially around signing secrets, refresh token storage, and revocation—moves your API from a “good enough” security posture to one that is built on industry-standard defensive patterns. Remember, in security, the smallest oversight is often the largest open door.</p>]]></content><author><name>Barış Kısır</name></author><category term="csharp" /><category term="security" /><category term="jwt" /><summary type="html"><![CDATA[Avoid the top 5 JWT authentication mistakes in .NET APIs. Secure your tokens against forgery, replay attacks, and weak signing secrets.]]></summary></entry><entry><title type="html">Redis Caching Strategies: When Caching Becomes a Problem</title><link href="https://www.bariskisir.com/blog/redis-caching-strategies-when-caching-becomes-a-problem" rel="alternate" type="text/html" title="Redis Caching Strategies: When Caching Becomes a Problem" /><published>2024-02-10T14:30:00+03:00</published><updated>2024-02-10T14:30:00+03:00</updated><id>https://www.bariskisir.com/blog/redis-caching-strategies-when-caching-becomes-a-problem</id><content type="html" xml:base="https://www.bariskisir.com/blog/redis-caching-strategies-when-caching-becomes-a-problem"><![CDATA[<p><strong>The Caching Paradox</strong></p>

<p>“Just add a cache” is a common response to performance issues. However, an incorrectly implemented distributed cache (like Redis) can introduce subtle bugs, data inconsistency, and even degrade performance through network congestion or serial overhead.</p>

<p><strong>Common Anti-Patterns</strong></p>

<ol>
  <li><strong>The Cache Stampede:</strong> When a highly requested key expires, multiple concurrent requests attempt to regenerate the data simultaneously, overwhelming your database.</li>
  <li><strong>Large Object Serialization:</strong> Storing massive object graphs (multi-megabyte JSON strings) in Redis causes high latency during network transmission and CPU spikes during deserialization.</li>
  <li><strong>Missing TTL Strategy:</strong> Inconsistent Time-To-Live (TTL) values leading to “stale data” bugs that are notoriously difficult to reproduce in development environments.</li>
</ol>

<p><strong>Advanced Strategies: The Two-Level Cache</strong></p>

<p>To mitigate the network overhead of Redis for extremely hot keys, implement a <strong>Two-Level Cache</strong> (L1: In-Memory, L2: Redis).</p>

<div class="language-csharp highlighter-rouge"><div class="highlight"><pre class="highlight"><code><span class="k">public</span> <span class="k">async</span> <span class="n">Task</span><span class="p">&lt;</span><span class="n">T</span><span class="p">&gt;</span> <span class="n">GetWithTwoLevelCache</span><span class="p">&lt;</span><span class="n">T</span><span class="p">&gt;(</span><span class="kt">string</span> <span class="n">key</span><span class="p">)</span>
<span class="p">{</span>
    <span class="c1">// Level 1: Check fast in-memory cache (e.g., IMemoryCache)</span>
    <span class="k">if</span> <span class="p">(</span><span class="n">_memoryCache</span><span class="p">.</span><span class="nf">TryGetValue</span><span class="p">(</span><span class="n">key</span><span class="p">,</span> <span class="k">out</span> <span class="n">T</span> <span class="k">value</span><span class="p">))</span> <span class="k">return</span> <span class="k">value</span><span class="p">;</span>

    <span class="c1">// Level 2: Fallback to distributed Redis cache</span>
    <span class="k">value</span> <span class="p">=</span> <span class="k">await</span> <span class="n">_redisCache</span><span class="p">.</span><span class="n">GetAsync</span><span class="p">&lt;</span><span class="n">T</span><span class="p">&gt;(</span><span class="n">key</span><span class="p">);</span>

    <span class="k">if</span> <span class="p">(</span><span class="k">value</span> <span class="p">!=</span> <span class="k">null</span><span class="p">)</span>
    <span class="p">{</span>
        <span class="c1">// Back-propagate to L1 for faster subsequent hits</span>
        <span class="n">_memoryCache</span><span class="p">.</span><span class="nf">Set</span><span class="p">(</span><span class="n">key</span><span class="p">,</span> <span class="k">value</span><span class="p">,</span> <span class="n">TimeSpan</span><span class="p">.</span><span class="nf">FromMinutes</span><span class="p">(</span><span class="m">1</span><span class="p">));</span>
    <span class="p">}</span>

    <span class="k">return</span> <span class="k">value</span><span class="p">;</span>
<span class="p">}</span>
</code></pre></div></div>

<p><strong>Operational Excellence in Redis</strong></p>

<ul>
  <li><strong>Key Compression:</strong> Utilize binary serializers like <strong>MessagePack</strong> or <strong>Protobuf</strong> instead of JSON to reduce memory footprint and bandwidth.</li>
  <li><strong>Monitoring:</strong> Keep a close watch on the <code class="language-plaintext highlighter-rouge">keyspace_hits</code> vs <code class="language-plaintext highlighter-rouge">keyspace_misses</code> ratio. A low hit rate might indicate that you are caching the wrong datasets.</li>
  <li><strong>Eviction Policies:</strong> Ensure your Redis instance is configured with <code class="language-plaintext highlighter-rouge">volatile-lru</code> or <code class="language-plaintext highlighter-rouge">allkeys-lru</code> to prevent memory exhaustion by gracefully removing the least recently used keys.</li>
</ul>

<p><strong>Final Thoughts: Caching as a First-Class Citizen</strong></p>

<p>Adding Redis to your stack shouldn’t be a reactive “patch” for slow queries. Instead, treat caching as a primary architectural component. By moving beyond basic “set and forget” patterns and implementing proactive invalidation and two-level strategies, you transform your cache from a source of potential inconsistency into a reliable performance accelerator. The goal isn’t just to make things faster, but to build a system that remains predictable under heavy load.</p>]]></content><author><name>Barış Kısır</name></author><category term="architecture" /><category term="redis" /><category term="caching" /><category term="performance" /><summary type="html"><![CDATA[Optimize Redis caching strategies to avoid common pitfalls. Prevent cache stampede, serialization issues, and stale data bugs.]]></summary></entry><entry><title type="html">Modular Monolith: Scaling Without Microservices</title><link href="https://www.bariskisir.com/blog/modular-monolith-scaling-without-microservices" rel="alternate" type="text/html" title="Modular Monolith: Scaling Without Microservices" /><published>2023-05-15T10:00:00+03:00</published><updated>2023-05-15T10:00:00+03:00</updated><id>https://www.bariskisir.com/blog/modular-monolith-scaling-without-microservices</id><content type="html" xml:base="https://www.bariskisir.com/blog/modular-monolith-scaling-without-microservices"><![CDATA[<p><strong>The Microservices Fallacy</strong></p>

<p>In recent years, microservices became the “default” choice for scaling applications, often prematurely. However, for many organizations, the operational overhead—service discovery, complex networking, and distributed tracing—outweighs the benefits. The <strong>Modular Monolith</strong> emerges as a superior middle ground, offering the logical separation of microservices with the deployment simplicity of a monolith.</p>

<p><strong>Core Architectural Principles</strong></p>

<p>A modular monolith is not just a “big ball of mud” structured as a single project. It requires strict boundary enforcement between domain modules.</p>

<ol>
  <li><strong>Strict Bound Contexts:</strong> Each module represents a distinct domain (e.g., Ordering, Shipping, Catalog) and owns its data and business logic.</li>
  <li><strong>Encapsulation:</strong> Modules should communicate through restricted interfaces or internal message buses (e.g., MediatR), never by directly accessing another module’s private implementation or database tables.</li>
  <li><strong>Physical Separation:</strong> Initially implemented as separate projects or namespaces, facilitating a future transition to microservices if actually required.</li>
</ol>

<p><strong>Implementation Strategy in .NET</strong></p>

<p>Utilizing the <strong>Clean Architecture</strong> pattern within each module ensures that business logic remains decoupled from external dependencies.</p>

<div class="language-csharp highlighter-rouge"><div class="highlight"><pre class="highlight"><code><span class="c1">// Example: Cross-module communication via Internal Events</span>
<span class="k">public</span> <span class="k">class</span> <span class="nc">OrderCreatedHandler</span> <span class="p">:</span> <span class="n">INotificationHandler</span><span class="p">&lt;</span><span class="n">OrderCreatedEvent</span><span class="p">&gt;</span>
<span class="p">{</span>
    <span class="k">private</span> <span class="k">readonly</span> <span class="n">IShippingService</span> <span class="n">_shippingService</span><span class="p">;</span>

    <span class="k">public</span> <span class="k">async</span> <span class="n">Task</span> <span class="nf">Handle</span><span class="p">(</span><span class="n">OrderCreatedEvent</span> <span class="n">notification</span><span class="p">,</span> <span class="n">CancellationToken</span> <span class="n">ct</span><span class="p">)</span>
    <span class="p">{</span>
        <span class="c1">// One module reacts to another without direct coupling</span>
        <span class="k">await</span> <span class="n">_shippingService</span><span class="p">.</span><span class="nf">ScheduleDelivery</span><span class="p">(</span><span class="n">notification</span><span class="p">.</span><span class="n">OrderId</span><span class="p">);</span>
    <span class="p">}</span>
<span class="p">}</span>
</code></pre></div></div>

<p><strong>Strategic Advantages</strong></p>

<ul>
  <li><strong>Deployment Simplicity:</strong> A single CI/CD pipeline and runtime environment.</li>
  <li><strong>Reduced Latency:</strong> Cross-component calls are in-process rather than over HTTP or gRPC.</li>
  <li><strong>Easier Refactoring:</strong> Changing boundaries is significantly simpler within a single codebase than across multiple repositories.</li>
</ul>

<p><strong>Choosing Architecture with Intent</strong></p>

<p>In the end, software architecture isn’t about following the flashiest trends; it’s about managing cognitive load and maintaining a sustainable development pace. A modular monolith allows you to grow your domain logic with the same rigor as microservices, but without the tax of distributed systems complexity. It’s an investment in your team’s productivity, ensuring that when you finally <em>do</em> need to extract a service, you’re doing so from a foundation of structured, decoupled logic rather than a messy entanglement.</p>]]></content><author><name>Barış Kısır</name></author><category term="architecture" /><category term="design" /><summary type="html"><![CDATA[Scale applications with modular monolith architecture. Achieve microservices-like domain separation without operational complexity.]]></summary></entry><entry><title type="html">Containerization Mastery: Dockerizing .NET Core Applications for Global Distribution</title><link href="https://www.bariskisir.com/blog/containerization-mastery-dockerizing-net-core-applications-for-global-distribution" rel="alternate" type="text/html" title="Containerization Mastery: Dockerizing .NET Core Applications for Global Distribution" /><published>2020-07-19T13:20:00+03:00</published><updated>2020-07-19T13:20:00+03:00</updated><id>https://www.bariskisir.com/blog/containerization-mastery-dockerizing-net-core-applications-for-global-distribution</id><content type="html" xml:base="https://www.bariskisir.com/blog/containerization-mastery-dockerizing-net-core-applications-for-global-distribution"><![CDATA[<p><strong>The Shift Toward Immutable Infrastructure</strong></p>

<p>In the modern DevOps landscape, containerization has transitioned from an optional optimization to a fundamental requirement. Docker provides a standardized environment that ensures your .NET Core applications run consistently across development, staging, and production boundaries, eliminating the “it works on my machine” paradigm.</p>

<p><strong>Foundational Infrastructure: Environment Configuration</strong></p>

<p>While Docker supports cross-platform execution, implementing your containerization pipeline on a Linux-based architecture (e.g., Ubuntu 20.04) often yields the most predictable results and optimal performance.</p>

<p><strong>Installation Pipeline:</strong></p>

<div class="language-bash highlighter-rouge"><div class="highlight"><pre class="highlight"><code><span class="c"># Updating package indices and installing the Docker engine</span>
<span class="nb">sudo </span>apt-get update <span class="o">&amp;&amp;</span> <span class="nb">sudo </span>apt-get <span class="nb">install</span> <span class="nt">-y</span> docker.io

<span class="c"># Verification of successful deployment</span>
docker <span class="nt">-v</span>
</code></pre></div></div>

<p><strong>Architecting the Container Blueprint: The Multi-Stage Dockerfile</strong></p>

<p>A high-efficiency Dockerfile utilizes multi-stage builds to minimize image size and maximize security by separating the build environment from the runtime environment.</p>

<div class="language-dockerfile highlighter-rouge"><div class="highlight"><pre class="highlight"><code><span class="c"># Stage 1: Runtime Base</span>
<span class="k">FROM</span><span class="w"> </span><span class="s">mcr.microsoft.com/dotnet/core/runtime:3.1</span><span class="w"> </span><span class="k">AS</span><span class="w"> </span><span class="s">base</span>
<span class="k">WORKDIR</span><span class="s"> /app</span>

<span class="c"># Stage 2: Compilation and Build</span>
<span class="k">FROM</span><span class="w"> </span><span class="s">mcr.microsoft.com/dotnet/core/sdk:3.1</span><span class="w"> </span><span class="k">AS</span><span class="w"> </span><span class="s">build</span>
<span class="k">WORKDIR</span><span class="s"> /src</span>
<span class="k">COPY</span><span class="s"> ["SimplisticApi.csproj", "./"]</span>
<span class="k">RUN </span>dotnet restore <span class="s2">"./SimplisticApi.csproj"</span>
<span class="k">COPY</span><span class="s"> . .</span>
<span class="k">RUN </span>dotnet build <span class="s2">"SimplisticApi.csproj"</span> <span class="nt">-c</span> Release <span class="nt">-o</span> /app/build

<span class="c"># Stage 3: Artifact Publication</span>
<span class="k">FROM</span><span class="w"> </span><span class="s">build</span><span class="w"> </span><span class="k">AS</span><span class="w"> </span><span class="s">publish</span>
<span class="k">RUN </span>dotnet publish <span class="s2">"SimplisticApi.csproj"</span> <span class="nt">-c</span> Release <span class="nt">-o</span> /app/publish

<span class="c"># Stage 4: Final Production Image</span>
<span class="k">FROM</span><span class="w"> </span><span class="s">base</span><span class="w"> </span><span class="k">AS</span><span class="w"> </span><span class="s">final</span>
<span class="k">WORKDIR</span><span class="s"> /app</span>
<span class="k">COPY</span><span class="s"> --from=publish /app/publish .</span>
<span class="k">ENTRYPOINT</span><span class="s"> ["dotnet", "SimplisticApi.dll"]</span>
</code></pre></div></div>

<p><strong>Image Orchestration and Local Verification</strong></p>

<p>Once the blueprint is defined, you can build and execute the containerized application locally.</p>

<div class="language-bash highlighter-rouge"><div class="highlight"><pre class="highlight"><code><span class="c"># Building the immutable image</span>
docker build <span class="nt">-t</span> net-core-app:v1 <span class="nb">.</span>

<span class="c"># Executing the containerized environment</span>
docker run net-core-app:v1
</code></pre></div></div>

<p><strong>Global Distribution via Docker Hub</strong></p>

<p>To facilitate remote deployment and team collaboration, leverage <strong>Docker Hub</strong> as your centralized image registry.</p>

<ol>
  <li><strong>Authentication:</strong> Authenticate your local daemon with the <code class="language-plaintext highlighter-rouge">docker login</code> command.</li>
  <li><strong>Tagging:</strong> Align your local image name with your Huber username (e.g., <code class="language-plaintext highlighter-rouge">username/app-name:tag</code>).</li>
  <li><strong>Transmission:</strong> Push the finalized image to the global registry.</li>
</ol>

<div class="language-bash highlighter-rouge"><div class="highlight"><pre class="highlight"><code><span class="c"># Naming for distribution</span>
docker tag net-core-app:v1 username/professional-net-app:v1

<span class="c"># Transmitting to the registry</span>
docker push username/professional-net-app:v1
</code></pre></div></div>

<p><strong>Strategic Advantages of Containerization</strong></p>

<ul>
  <li><strong>Isolation:</strong> Ensures application dependencies do not conflict with the host OS or other containers.</li>
  <li><strong>Scalability:</strong> Facilitates rapid horizontal scaling via orchestrators like <strong>Kubernetes</strong> or <strong>Docker Swarm</strong>.</li>
  <li><strong>Portability:</strong> Single-artifact deployment across any infrastructure that supports the Docker runtime.</li>
</ul>

<blockquote>
  <p><strong>Deep Dive:</strong> Explore the comprehensive containerization lifecycle and advanced CI/CD integration patterns on <a href="https://github.com/bariskisir/dockerize-net-core" target="_blank">GitHub</a>.</p>
</blockquote>]]></content><author><name>Barış Kısır</name></author><category term="docker" /><category term="devops" /><summary type="html"><![CDATA[Dockerize .NET Core applications for consistent deployment across environments. Containerization best practices with Dockerfile examples.]]></summary></entry><entry><title type="html">Personal Branding: Orchestrating a GitHub Profile-Level README</title><link href="https://www.bariskisir.com/blog/personal-branding-orchestrating-a-github-profile-level-readme" rel="alternate" type="text/html" title="Personal Branding: Orchestrating a GitHub Profile-Level README" /><published>2020-07-18T05:40:00+03:00</published><updated>2020-07-18T05:40:00+03:00</updated><id>https://www.bariskisir.com/blog/personal-branding-orchestrating-a-github-profile-level-readme</id><content type="html" xml:base="https://www.bariskisir.com/blog/personal-branding-orchestrating-a-github-profile-level-readme"><![CDATA[<p><strong>The Evolution of Developer Discoverability</strong></p>

<p>GitHub recently introduced a transformative feature for developer discoverability: the Profile README. This allows developers to showcase their technical expertise, ongoing contributions, and personal branding directly on their primary GitHub landing page, moving beyond the traditional list of pinned repositories.</p>

<p><strong>Orchestrating the “Secret” Repository</strong></p>

<p>To activate this feature, you must create a specialized repository that acts as a global profile configuration.</p>

<ol>
  <li><strong>Identity Alignment:</strong> Create a new repository where the repository name matches your GitHub username exactly (e.g., <code class="language-plaintext highlighter-rouge">username/username</code>).</li>
  <li><strong>Visibility:</strong> The repository must be configured as <strong>Public</strong>.</li>
  <li><strong>Initialization:</strong> Ensure you include a <code class="language-plaintext highlighter-rouge">README.md</code> file during the creation process.</li>
</ol>

<p><strong>Designing the Profile Landscape</strong></p>

<p>GitHub provides a specialized template upon repository initialization, which serves as a foundation for your profile’s narrative.</p>

<p><strong>Strategic Best Practices for Profile Design</strong></p>

<ul>
  <li><strong>Dynamic Content:</strong> Integrate <strong>GitHub Actions</strong> to dynamically update your profile with latest blog posts, Spotify activity, or contribution statistics.</li>
  <li><strong>Visual Impact:</strong> Utilize markdown-supported badges (e.g., Shields.io) to display your technical stack graphically.</li>
  <li><strong>Accessibility:</strong> Ensure your profile remains scannable and accessible across both light and dark GitHub themes.</li>
  <li><strong>Iterative Design:</strong> Leverage specialized markdown editors like <a href="https://stackedit.io/app" target="_blank">StackEdit</a> to preview and refine your layout before pushing to production.</li>
</ul>

<p>By treating your GitHub profile as an evolving technical portfolio, you can significantly enhance your visibility within the global engineering community.</p>]]></content><author><name>Barış Kısır</name></author><category term="github" /><category term="career" /><summary type="html"><![CDATA[Create a GitHub profile-level README to showcase your developer portfolio. Personal branding guide for GitHub discoverability.]]></summary></entry><entry><title type="html">Modern Security Architecture: JWT Authentication and Password Hashing in .NET Core with MySQL</title><link href="https://www.bariskisir.com/blog/modern-security-architecture-jwt-authentication-and-password-hashing-in-net-core-with-mysql" rel="alternate" type="text/html" title="Modern Security Architecture: JWT Authentication and Password Hashing in .NET Core with MySQL" /><published>2019-08-14T10:50:00+03:00</published><updated>2019-08-14T10:50:00+03:00</updated><id>https://www.bariskisir.com/blog/modern-security-architecture-jwt-authentication-and-password-hashing-in-net-core-with-mysql</id><content type="html" xml:base="https://www.bariskisir.com/blog/modern-security-architecture-jwt-authentication-and-password-hashing-in-net-core-with-mysql"><![CDATA[<p><strong>The Foundations of Stateless Identity</strong></p>

<p>A JSON Web Token (JWT) is a standardized, compact method (RFC 7519) for securely transmitting information as a JSON object. In modern distributed systems, JWTs are the preferred mechanism for stateless authentication, allowing services to verify user identity without maintaining localized session state.</p>

<p><strong>Anatomy of a JWT</strong></p>

<p>A JWT is a base64url encoded string consisting of three cryptographically bound segments:</p>

<ol>
  <li><strong>Header:</strong> Defines the signing algorithm (e.g., HS256) and token type.</li>
  <li><strong>Payload:</strong> Contains <strong>Claims</strong>—assertions about the user (e.g., ID, Role, Email) and technical metadata like expiration (<code class="language-plaintext highlighter-rouge">exp</code>).</li>
  <li><strong>Signature:</strong> A cryptographic hash of the header and payload, generated using a server-side secret key to ensure data integrity.</li>
</ol>

<p><strong>Strategic Implementation: Generating Secure Tokens</strong></p>

<p>The following implementation demonstrates how to orchestrate a login workflow that validates credentials and issues a signed JWT.</p>

<div class="language-csharp highlighter-rouge"><div class="highlight"><pre class="highlight"><code><span class="p">[</span><span class="n">AllowAnonymous</span><span class="p">]</span>
<span class="p">[</span><span class="nf">HttpPost</span><span class="p">(</span><span class="s">"authenticate"</span><span class="p">)]</span>
<span class="k">public</span> <span class="n">ActionResult</span><span class="p">&lt;</span><span class="n">AuthResponse</span><span class="p">&gt;</span> <span class="nf">Login</span><span class="p">([</span><span class="n">FromBody</span><span class="p">]</span> <span class="n">LoginRequest</span> <span class="n">request</span><span class="p">)</span>
<span class="p">{</span>
    <span class="k">using</span> <span class="p">(</span><span class="kt">var</span> <span class="n">context</span> <span class="p">=</span> <span class="k">new</span> <span class="nf">ApplicationDbContext</span><span class="p">())</span>
    <span class="p">{</span>
        <span class="kt">var</span> <span class="n">user</span> <span class="p">=</span> <span class="n">context</span><span class="p">.</span><span class="n">Users</span><span class="p">.</span><span class="nf">SingleOrDefault</span><span class="p">(</span><span class="n">u</span> <span class="p">=&gt;</span> <span class="n">u</span><span class="p">.</span><span class="n">Email</span> <span class="p">==</span> <span class="n">request</span><span class="p">.</span><span class="n">Email</span><span class="p">);</span>
        <span class="k">if</span> <span class="p">(</span><span class="n">user</span> <span class="p">!=</span> <span class="k">null</span> <span class="p">&amp;&amp;</span> <span class="n">CryptoUtility</span><span class="p">.</span><span class="nf">VerifySecureHash</span><span class="p">(</span><span class="n">request</span><span class="p">.</span><span class="n">Password</span><span class="p">,</span> <span class="n">user</span><span class="p">.</span><span class="n">Salt</span><span class="p">,</span> <span class="n">user</span><span class="p">.</span><span class="n">HashedPassword</span><span class="p">))</span>
        <span class="p">{</span>
            <span class="kt">var</span> <span class="n">tokenHandler</span> <span class="p">=</span> <span class="k">new</span> <span class="nf">JwtSecurityTokenHandler</span><span class="p">();</span>
            <span class="kt">var</span> <span class="n">key</span> <span class="p">=</span> <span class="n">Encoding</span><span class="p">.</span><span class="n">ASCII</span><span class="p">.</span><span class="nf">GetBytes</span><span class="p">(</span><span class="n">_config</span><span class="p">[</span><span class="s">"Jwt:Secret"</span><span class="p">]);</span>

            <span class="kt">var</span> <span class="n">tokenDescriptor</span> <span class="p">=</span> <span class="k">new</span> <span class="n">SecurityTokenDescriptor</span>
            <span class="p">{</span>
                <span class="n">Subject</span> <span class="p">=</span> <span class="k">new</span> <span class="nf">ClaimsIdentity</span><span class="p">(</span><span class="k">new</span><span class="p">[]</span> <span class="p">{</span>
                    <span class="k">new</span> <span class="nf">Claim</span><span class="p">(</span><span class="n">ClaimTypes</span><span class="p">.</span><span class="n">Name</span><span class="p">,</span> <span class="n">user</span><span class="p">.</span><span class="n">Email</span><span class="p">),</span>
                    <span class="k">new</span> <span class="nf">Claim</span><span class="p">(</span><span class="n">ClaimTypes</span><span class="p">.</span><span class="n">Role</span><span class="p">,</span> <span class="n">user</span><span class="p">.</span><span class="n">Role</span><span class="p">)</span>
                <span class="p">}),</span>
                <span class="n">Expires</span> <span class="p">=</span> <span class="n">DateTime</span><span class="p">.</span><span class="n">UtcNow</span><span class="p">.</span><span class="nf">AddHours</span><span class="p">(</span><span class="m">2</span><span class="p">),</span>
                <span class="n">SigningCredentials</span> <span class="p">=</span> <span class="k">new</span> <span class="nf">SigningCredentials</span><span class="p">(</span><span class="k">new</span> <span class="nf">SymmetricSecurityKey</span><span class="p">(</span><span class="n">key</span><span class="p">),</span> <span class="n">SecurityAlgorithms</span><span class="p">.</span><span class="n">HmacSha256Signature</span><span class="p">)</span>
            <span class="p">};</span>

            <span class="kt">var</span> <span class="n">token</span> <span class="p">=</span> <span class="n">tokenHandler</span><span class="p">.</span><span class="nf">CreateToken</span><span class="p">(</span><span class="n">tokenDescriptor</span><span class="p">);</span>
            <span class="k">return</span> <span class="nf">Ok</span><span class="p">(</span><span class="k">new</span> <span class="n">AuthResponse</span> <span class="p">{</span> <span class="n">Token</span> <span class="p">=</span> <span class="n">tokenHandler</span><span class="p">.</span><span class="nf">WriteToken</span><span class="p">(</span><span class="n">token</span><span class="p">)</span> <span class="p">});</span>
        <span class="p">}</span>
    <span class="p">}</span>
    <span class="k">return</span> <span class="nf">Unauthorized</span><span class="p">(</span><span class="s">"Authentication failed: Invalid credentials."</span><span class="p">);</span>
<span class="p">}</span>
</code></pre></div></div>

<p><strong>Credential Hardening: Salted Hashing in .NET</strong></p>

<p>Raw SHA-based hashing is insufficient against modern dictionary and rainbow table attacks. We implement a robust defense by generating a unique, cryptographically random <strong>Salt</strong> for every user and executing iterative hashing.</p>

<div class="language-csharp highlighter-rouge"><div class="highlight"><pre class="highlight"><code><span class="k">public</span> <span class="k">static</span> <span class="k">class</span> <span class="nc">CryptoUtility</span>
<span class="p">{</span>
    <span class="k">public</span> <span class="k">static</span> <span class="kt">string</span> <span class="nf">GenerateSalt</span><span class="p">()</span> <span class="p">=&gt;</span> <span class="n">Guid</span><span class="p">.</span><span class="nf">NewGuid</span><span class="p">().</span><span class="nf">ToString</span><span class="p">(</span><span class="s">"N"</span><span class="p">);</span>

    <span class="k">public</span> <span class="k">static</span> <span class="kt">string</span> <span class="nf">ComputeIterativeHash</span><span class="p">(</span><span class="kt">string</span> <span class="n">password</span><span class="p">,</span> <span class="kt">string</span> <span class="n">salt</span><span class="p">)</span>
    <span class="p">{</span>
        <span class="kt">var</span> <span class="n">hash</span> <span class="p">=</span> <span class="n">password</span> <span class="p">+</span> <span class="n">salt</span><span class="p">;</span>
        <span class="k">for</span> <span class="p">(</span><span class="kt">int</span> <span class="n">i</span> <span class="p">=</span> <span class="m">0</span><span class="p">;</span> <span class="n">i</span> <span class="p">&lt;</span> <span class="m">10000</span><span class="p">;</span> <span class="n">i</span><span class="p">++)</span> <span class="c1">// Standard iteration count for computational cost</span>
        <span class="p">{</span>
            <span class="n">hash</span> <span class="p">=</span> <span class="n">BitConverter</span><span class="p">.</span><span class="nf">ToString</span><span class="p">(</span><span class="n">SHA512</span><span class="p">.</span><span class="nf">Create</span><span class="p">().</span><span class="nf">ComputeHash</span><span class="p">(</span><span class="n">Encoding</span><span class="p">.</span><span class="n">UTF8</span><span class="p">.</span><span class="nf">GetBytes</span><span class="p">(</span><span class="n">hash</span><span class="p">)));</span>
        <span class="p">}</span>
        <span class="k">return</span> <span class="n">hash</span><span class="p">;</span>
    <span class="p">}</span>
<span class="p">}</span>
</code></pre></div></div>

<p><strong>Configuring the Middleware Pipeline</strong></p>

<p>In the <code class="language-plaintext highlighter-rouge">.NET Core</code> startup sequence, we inject the authentication handlers to intercept and validate incoming <code class="language-plaintext highlighter-rouge">Bearer</code> tokens.</p>

<div class="language-csharp highlighter-rouge"><div class="highlight"><pre class="highlight"><code><span class="k">public</span> <span class="k">void</span> <span class="nf">ConfigureServices</span><span class="p">(</span><span class="n">IServiceCollection</span> <span class="n">services</span><span class="p">)</span>
<span class="p">{</span>
    <span class="n">services</span><span class="p">.</span><span class="nf">AddAuthentication</span><span class="p">(</span><span class="n">x</span> <span class="p">=&gt;</span> <span class="p">{</span>
        <span class="n">x</span><span class="p">.</span><span class="n">DefaultAuthenticateScheme</span> <span class="p">=</span> <span class="n">JwtBearerDefaults</span><span class="p">.</span><span class="n">AuthenticationScheme</span><span class="p">;</span>
        <span class="n">x</span><span class="p">.</span><span class="n">DefaultChallengeScheme</span> <span class="p">=</span> <span class="n">JwtBearerDefaults</span><span class="p">.</span><span class="n">AuthenticationScheme</span><span class="p">;</span>
    <span class="p">}).</span><span class="nf">AddJwtBearer</span><span class="p">(</span><span class="n">x</span> <span class="p">=&gt;</span> <span class="p">{</span>
        <span class="n">x</span><span class="p">.</span><span class="n">RequireHttpsMetadata</span> <span class="p">=</span> <span class="k">true</span><span class="p">;</span>
        <span class="n">x</span><span class="p">.</span><span class="n">SaveToken</span> <span class="p">=</span> <span class="k">true</span><span class="p">;</span>
        <span class="n">x</span><span class="p">.</span><span class="n">TokenValidationParameters</span> <span class="p">=</span> <span class="k">new</span> <span class="n">TokenValidationParameters</span> <span class="p">{</span>
            <span class="n">ValidateIssuerSigningKey</span> <span class="p">=</span> <span class="k">true</span><span class="p">,</span>
            <span class="n">IssuerSigningKey</span> <span class="p">=</span> <span class="k">new</span> <span class="nf">SymmetricSecurityKey</span><span class="p">(</span><span class="n">Encoding</span><span class="p">.</span><span class="n">ASCII</span><span class="p">.</span><span class="nf">GetBytes</span><span class="p">(</span><span class="n">Configuration</span><span class="p">[</span><span class="s">"Jwt:Secret"</span><span class="p">])),</span>
            <span class="n">ValidateIssuer</span> <span class="p">=</span> <span class="k">false</span><span class="p">,</span>
            <span class="n">ValidateAudience</span> <span class="p">=</span> <span class="k">false</span>
        <span class="p">};</span>
    <span class="p">});</span>
<span class="p">}</span>
</code></pre></div></div>

<p><strong>Data Persistence: MySQL Integration</strong></p>

<p>For high-performance data storage, MySQL is utilized via the <code class="language-plaintext highlighter-rouge">Pomelo.EntityFrameworkCore.MySql</code> provider, facilitating seamless EF Core migrations and strongly-typed queries.</p>

<div class="language-sql highlighter-rouge"><div class="highlight"><pre class="highlight"><code><span class="c1">-- Optimized User Schema</span>
<span class="k">CREATE</span> <span class="k">TABLE</span> <span class="nv">`Users`</span> <span class="p">(</span>
  <span class="nv">`Id`</span> <span class="nb">int</span> <span class="k">NOT</span> <span class="k">NULL</span> <span class="n">AUTO_INCREMENT</span><span class="p">,</span>
  <span class="nv">`Email`</span> <span class="nb">varchar</span><span class="p">(</span><span class="mi">255</span><span class="p">)</span> <span class="k">NOT</span> <span class="k">NULL</span><span class="p">,</span>
  <span class="nv">`Salt`</span> <span class="nb">char</span><span class="p">(</span><span class="mi">32</span><span class="p">)</span> <span class="k">NOT</span> <span class="k">NULL</span><span class="p">,</span>
  <span class="nv">`HashedPassword`</span> <span class="nb">varchar</span><span class="p">(</span><span class="mi">512</span><span class="p">)</span> <span class="k">NOT</span> <span class="k">NULL</span><span class="p">,</span>
  <span class="nv">`Role`</span> <span class="nb">varchar</span><span class="p">(</span><span class="mi">50</span><span class="p">)</span> <span class="k">DEFAULT</span> <span class="s1">'User'</span><span class="p">,</span>
  <span class="k">PRIMARY</span> <span class="k">KEY</span> <span class="p">(</span><span class="nv">`Id`</span><span class="p">),</span>
  <span class="k">UNIQUE</span> <span class="k">KEY</span> <span class="nv">`Email_UNIQUE`</span> <span class="p">(</span><span class="nv">`Email`</span><span class="p">)</span>
<span class="p">)</span> <span class="n">ENGINE</span><span class="o">=</span><span class="n">InnoDB</span> <span class="k">DEFAULT</span> <span class="n">CHARSET</span><span class="o">=</span><span class="n">utf8mb4</span><span class="p">;</span>
</code></pre></div></div>

<p><strong>Advanced Security Best Practices</strong></p>

<ol>
  <li><strong>Secret Rotation:</strong> Never hard-code your secret keys. Utilize environment variables or Azure Key Vault.</li>
  <li><strong>HTTPS Enforcement:</strong> JWTs are susceptible to man-in-the-middle attacks if transmitted over unencrypted channels.</li>
  <li><strong>Claims Sensitivity:</strong> Do not include sensitive information (like passwords or PII) in the JWT payload, as it is easily decoded by third parties.</li>
</ol>

<blockquote>
  <p><strong>Deep Dive:</strong> Explore the full source code and database migrations on <a href="https://github.com/bariskisir/netcoreauthjwtmysql" target="_blank">GitHub</a>.</p>
</blockquote>]]></content><author><name>Barış Kısır</name></author><category term="csharp" /><category term="security" /><category term="jwt" /><category term="sql" /><summary type="html"><![CDATA[Implement JWT authentication and password hashing in .NET Core with MySQL. Build stateless identity management with secure token-based auth.]]></summary></entry><entry><title type="html">Interactive Documentation: Integrating Swagger UI in ASP.NET Web API</title><link href="https://www.bariskisir.com/blog/interactive-documentation-integrating-swagger-ui-in-asp-net-web-api" rel="alternate" type="text/html" title="Interactive Documentation: Integrating Swagger UI in ASP.NET Web API" /><published>2019-01-26T20:30:00+03:00</published><updated>2019-01-26T20:30:00+03:00</updated><id>https://www.bariskisir.com/blog/interactive-documentation-integrating-swagger-ui-in-asp-net-web-api</id><content type="html" xml:base="https://www.bariskisir.com/blog/interactive-documentation-integrating-swagger-ui-in-asp-net-web-api"><![CDATA[<p><strong>The Paradigm of Living Documentation</strong></p>

<p>Swagger UI is a sophisticated display framework that consumes an OpenAPI specification (formerly known as Swagger) and dynamically generates a beautiful, interactive documentation suite. Unlike static documentation, Swagger UI identifies the live endpoints of your ASP.NET Web API and provides a sandbox environment for real-time interaction.</p>

<p><strong>Why Swagger UI? Efficiency and Discoverability</strong></p>

<p>Traditional ASP.NET Help Pages are often static and lack the capability for direct browser-based interaction. Swagger UI bridges this gap by offering several strategic advantages:</p>

<ul>
  <li><strong>Interactive Sandbox:</strong> Consumers can execute API calls directly from the browser without third-party tools like Postman.</li>
  <li><strong>Client Decoupling:</strong> Facilitates frictionless collaboration between back-end and front-end teams by providing a “source of truth” for endpoint contracts.</li>
  <li><strong>Discovery:</strong> Automatically documents data models (DTOs), enumerations, and HTTP status codes.</li>
</ul>

<p><strong>Installation via NuGet</strong></p>

<p>The most streamlined way to integrate Swagger into a .NET project is via the <code class="language-plaintext highlighter-rouge">Swashbuckle</code> package.</p>

<div class="language-powershell highlighter-rouge"><div class="highlight"><pre class="highlight"><code><span class="n">Install-Package</span><span class="w"> </span><span class="nx">Swashbuckle</span><span class="w">
</span></code></pre></div></div>

<p><strong>Configuration Strategy</strong></p>

<p>Upon installation, a <code class="language-plaintext highlighter-rouge">SwaggerConfig.cs</code> file is added to the <code class="language-plaintext highlighter-rouge">App_Start</code> directory. This file utilizes a <code class="language-plaintext highlighter-rouge">PreApplicationStartMethod</code> attribute to register the Swagger engine during the OWIN/IIS startup sequence.</p>

<div class="language-csharp highlighter-rouge"><div class="highlight"><pre class="highlight"><code><span class="p">[</span><span class="n">assembly</span><span class="p">:</span> <span class="nf">PreApplicationStartMethod</span><span class="p">(</span><span class="k">typeof</span><span class="p">(</span><span class="n">SwaggerConfig</span><span class="p">),</span> <span class="s">"RegisterSwaggerConfig"</span><span class="p">)]</span>

<span class="k">namespace</span> <span class="nn">ProfessionalApi.App_Start</span>
<span class="p">{</span>
    <span class="k">public</span> <span class="k">class</span> <span class="nc">SwaggerConfig</span>
    <span class="p">{</span>
        <span class="k">public</span> <span class="k">static</span> <span class="k">void</span> <span class="nf">RegisterSwaggerConfig</span><span class="p">()</span>
        <span class="p">{</span>
            <span class="n">GlobalConfiguration</span><span class="p">.</span><span class="n">Configuration</span>
                <span class="p">.</span><span class="nf">EnableSwagger</span><span class="p">(</span><span class="n">c</span> <span class="p">=&gt;</span> <span class="p">{</span>
                    <span class="n">c</span><span class="p">.</span><span class="nf">SingleApiVersion</span><span class="p">(</span><span class="s">"v1"</span><span class="p">,</span> <span class="s">"Enterprise Notes API"</span><span class="p">);</span>
                    <span class="n">c</span><span class="p">.</span><span class="nf">IncludeXmlComments</span><span class="p">(</span><span class="nf">GetXmlCommentsPath</span><span class="p">());</span> <span class="c1">// Include XML comments for deeper context</span>
                <span class="p">})</span>
                <span class="p">.</span><span class="nf">EnableSwaggerUi</span><span class="p">(</span><span class="n">c</span> <span class="p">=&gt;</span> <span class="p">{</span>
                    <span class="n">c</span><span class="p">.</span><span class="nf">DocumentTitle</span><span class="p">(</span><span class="s">"Notes API Documentation"</span><span class="p">);</span>
                <span class="p">});</span>
        <span class="p">}</span>
    <span class="p">}</span>
<span class="p">}</span>
</code></pre></div></div>

<p><strong>Accessing the Documentation</strong></p>

<p>Once deployed, the interactive interface is accessible via the <code class="language-plaintext highlighter-rouge">/swagger</code> endpoint.</p>

<p><strong>Strategic Best Practices</strong></p>

<ol>
  <li><strong>XML Documentation:</strong> Enable XML documentation file generation in your project settings to allow Swagger to pull in your <code class="language-plaintext highlighter-rouge">&lt;summary&gt;</code> and <code class="language-plaintext highlighter-rouge">&lt;param&gt;</code> comments into the UI.</li>
  <li><strong>Security Schemes:</strong> Configure Swagger to support <code class="language-plaintext highlighter-rouge">OAuth 2.0</code> or <code class="language-plaintext highlighter-rouge">Bearer Token</code> headers so that developers can test protected endpoints.</li>
  <li><strong>Production Hardening:</strong> Ensure Swagger is only enabled in development or staging environments to prevent exposing internal infrastructure details in production.</li>
</ol>

<blockquote>
  <p><strong>Technical Artifacts:</strong> The complete integration pattern and configuration scripts are available for review on <a href="https://github.com/bariskisir/oauth-webapi-usage/tree/feature/swagger" target="_blank">GitHub</a>.</p>
</blockquote>]]></content><author><name>Barış Kısır</name></author><category term="csharp" /><category term="webapi" /><category term="documentation" /><summary type="html"><![CDATA[Integrate Swagger UI in ASP.NET Web API for interactive API documentation. Enable live endpoint testing from the browser.]]></summary></entry></feed>